| Guymager homepage |

|
Introduction
Guymager [ˈgɪmɪdʒər] is a free forensic imager for media acquisition. Its main features are:
- Easy user interface in different languages
- Runs under Linux
- Really fast, due to multi-threaded, pipelined design and multi-threaded data compression
- Makes full usage of multi-processor machines
- Generates flat (dd), EWF (E01) and AFF images, supports disk cloning
- Free of charges, completely open source
The latest version is 0.8.13.
Have a look at the Guymager Wiki.
How it looks
 Explanations:
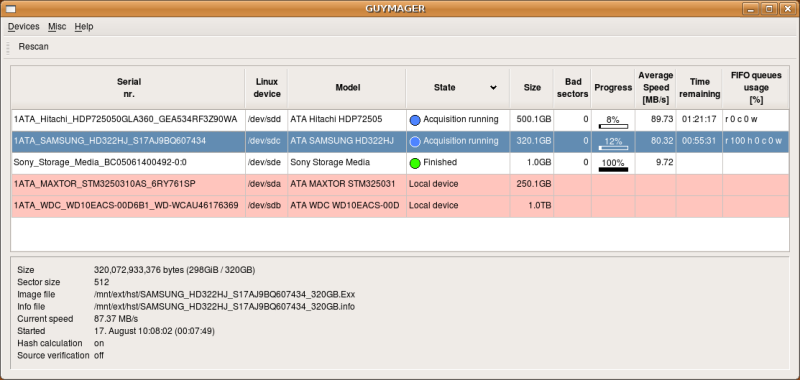
- The connected storage devices are listed in the upper part. New devices can be connected at any
time - press the rescan button for displaying them.
- The devices marked with light red color are local hard disks. They cannot be acquired, thus preventing
from acquiring the wrong disks. Local hard disks are recognised by their serial numbers which can be
entered in the configuration file.
- The lower part shows more detailed info about the acquisition currently selected by the blue cursor.

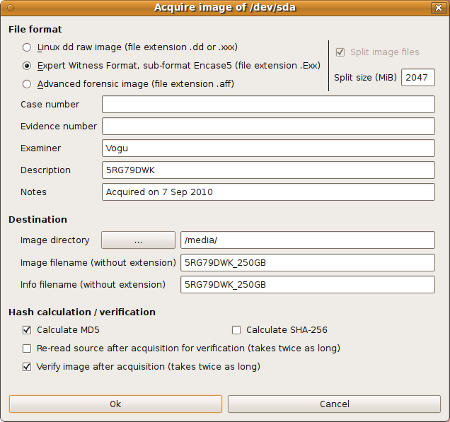
The above screenshot shows the default acquisition dialog. Another dialog exists for cloning disks. Both can be easily adapted to fit your
requirements. You may add or remove fields. You can set their default values statically (text) and dynamically (current date, size of disk,
serial number, ...). Have a look at /etc/guymager/guymager.cfg.
Installation
Debian and Ubuntu
Guymager is contained in the standard repositories of several distributions, for example Debian
(Squeeze or later) and Ubuntu (10.04 or later). In Ubuntu, the universe repository must be
activated.
The installation could be done with a graphical tool like the Ubuntu Software Center or Synaptic. The command line
is a safe and easy alternative that always works and is independent from the latest desktop design hype:
   sudo apt-get update
   sudo apt-get install guymager
Using the pinguin APT server
Daniel's pinguin server always contains the latest Guymager release. It is the recommended
repository for installing Guymager and keeping it up to date. Use this repository for your Ubuntu,
Debian and Debian-based Linux systems.
Follow these steps:
- Add the pinguin server and its public key by executing the following commands:
 sudo wget -nH -rP /etc/apt/sources.list.d/ http://deb.pinguin.lu/pinguin.lu.list
    wget -q http://deb.pinguin.lu/debsign_public.key -O- | sudo apt-key add -
Currently, i386 and amd64 systems are supported, powerpc packages are available upon request.
- Execute the following commands:
   sudo apt-get update
   sudo apt-get install guymager-beta
- Start the program with
guymager
Eventhough the package is named guymager-beta, it has been intensively tested and is absolutely stable
software. It just hasn't found its way into a distribution yet.
RPM packages
RPM packages are available at the pkgs.org. Many thanks to Larry Rogers for packaging!
Manual download and installation of the Debian packages
If you do not like to add the pinguin repository permanently, you can download and install
the packages manually:
- Browse to deb.pinguin.lu, and choose the directory
corresponding to your processor architecture (i386 or amd64).
Remark: amd64 refers to the architecture, not the processor. So, amd64 is ok for both,
the AMD and Intel 64 bit processors.
- Download the guymager-beta package.
Installation from the command line:
- Open a shell and get root rights
- Change to the directory with the files you downloaded.
- Use the following commands for the installation:
   sudo apt-get update
   sudo dpkg -i guymager-beta_xxx_amd64.deb
   sudo apt-get -f install
xxx stands for the version number. In case you have a 32 bit system, replace amd64 by i386.
The 2nd command most probably returns some error messages about
missing packages. They are installed by executing the 3rd command.
- There are 2 recommended packages you should install as well:
sudo apt-get install smartmontools hdparm
- Start the program with
guymager
Configuration and log
Guymager works with two configuration files:
- /etc/guymager/guymager.cfg
The main configuration file. You should not change it, as your changes get lost when installing a new version of guymager.
- /etc/guymager/local.cfg
Use this file for local changes instead. The parameters adjusted here have precedence over those in guymager.cfg. guymager.cfg includes
local.cfg at its very end. If a parameter is set several times, guymager retains the last setting.
If you want to try a parameter quickly without editing local.cfg, you may put it on the command line. For example:
guymager EwfCompression=BEST
The command line precedes both configuration files. There are 2 parameters which only can be set on the command line:
- cfg - The configuration file to be used. The default is /etc/guymager/guymager.cfg.
- log - The log file to be used. The default is /var/log/guymager.log.
Example:
guymager cfg="/tests/g_special.cfg" log="/mylogs/guymager.log"
The configuration parameters are well documented inside /etc/guymager/guymager.cfg. Just remember not to do any changes there.
If ever there's a problem, have a look at the log file /var/log/guymager.log. Please attach the log file when reporting a problem.
Compiling the source code
Note for Debian and Ubuntu users: Install packages build-essential, qtbase5-dev and libparted-dev.
Get the source code:
- Guymager's source is stored in a subversion repository on sourceforge. Go to the
code page of the Guymager project and follow the instructions given there (execute the command starting with "svn checkout ..."; you need to have
subversion installed).
- The same procedure applies to libguytools.
- The sources for libewf can be downloaded from different places. I recommend version 20140608, which has been thoroughly tested with
Guymager. You may download it from the
Fedora project, for example, or search the web for the libewf-20140608tar.gz.
Let's start with libewf:
- Unpack the archive
- Set environment variable CFLAGS="-fPIC", then compile and install with the standard triplet 'configure / make / make install'. Missing
libs and tools have to be installed, refer to the error messages. You probably have to go several times through the
"install missing libs / configure" cycle until everything is ok.
- If ever you encounter error messages of the type 'undefined reference libuna...' then you probably have a newer version of the C compiler
and need to adapt libewf. Edit the file libuna/libuna_extern.h and comment in the word "extern" at the end of the file.
- If some of the previous libuna error messages persist then edit file libuna/libuna_base32_stream.h and modify the prototype
for function libuna_base32_character_copy_to_quintet by adding the line "LIBUNA_EXTERN \" (make it look just like prototype
below).
- In case the error message "Missing libbfio.h" you probably already have some libbfio parts installed. Force libewf to use its local
version of that lib by removing the packages related to libbfio. The packages maybe re-installed after successful compilation.
- After successful completion, you not only have the lib required by Guymager, but the libewf tools as well.
So, it's easy to check if libewf works fine. Try for instance to run ewfinfo on a EWF (E01) image if you have one available.
Try ewfacquire on a memory stick otherwise (see the man pages for details).
Note: Guymager may as well be used without libewf - and still is able to generate EWF files. See below for instructions.
Next comes libguytools:
- Change to the directory where you did the subversion checkout, go to the subdir tags and further down to the latest version.
- To compile libguytools:
./create_version_file.sh
qmake -qt=qt5 trunk.pro
make
Most probably, there will be some tools or libs missing, for instance the Qt developer stuff (libguytools uses qmake). The same
procedure as before applies (install/retry/install...). Some of the commands and libs required can be found in different Qt versions
and packages. In case of doubt, choose Qt version 5.
- Next, a statically linkable version of the lib is built:
qmake -qt=qt5 toolsstatic.pro
make
- There is no installation procedure (except for Debian, see above). After completion of the previous step, the lib is in the
subdirectory lib. Copy it to a location that is included in the search path on your system (this could be /usr/local/lib, for instance) or
redirect the LD_LIBRARY_PATH environment variable.
- Make the headers from the subdirectory "include" available to other applications (for instance by copying to /usr/local/include).
And finally, Guymager:
- Change to the directory where you did the subversion checkout, go to the subdir tags and further down to the latest version.
- Create the Makefile:
qmake -qt=qt5
Alternatively, if you prefer not to use libewf, you may generate the Makefile like this:
qmake -qt=qt5 DEFINES*="ENABLE_LIBEWF=0"
Even without libewf, Guymager still is perfectly able to generate EWF files.
- Compile:
make
If ever you have problems with the library path of libguytools or libewf: Have a look at the end of file guymager.pro and adapt the LIBS
statements according to the path where you put the libs. Re-execute qmake when changing guymager.pro.
- Create the language files:
lrelease guymager.pro
- Copy the configuration file guymager.cfg to /etc/guymager/
Guymager should now be ready. Start it with:
./guymager
This generic description should work for most Linux flavours.
The Guymager Wiki contains a detailed
description for Guymager 0.8.12 on Debian 10 Buster.
It also contains a
detailed, but unfortunately outdated description for OpenSuse.
Live CDs with Guymager
Guymager is contained on several live CDs and VMs. Some of them are updated more often than others. Take care to chose one with a recent version of Guymager.
Broken EWF images
There is no known case where Guymager produced corrupt images. However, especially EWF images are critical
as many forensic tools reject to load them even if there's only a small error in a single segment file. Some
examples of common problems:
- The segment files were stored on DVDs some years ago and now, some of the DVDs produce read errors.
- A NAS stores data inconsistently (there's one NAS manufacturer that is known for this horrible bug).
- The disk that was used for storing the image segment files has bad sectors.
- One of the segment files was deleted by accident.
Contact the author of Guymager (see below) if ever you need to extract the data residing in a
corrupt EWF image. The data recovery service is free of charge for law enforcment agencies - and maybe for
others as well ;-)
Contact
The author of Guymager can be reached by an email to develop at faert point net. Please write in German, English, French or Spanish.
Junk emails are being deleted automatically. Bad luck if this happens to your non junk email. Rewrite your email in a less junky style if you get no answer.
If ever you want to report a problem, be sure to attach the Guymager log file.
Beyond computer forensics
Nice photos on Photographe Luxembourg :)
Disclaimer
The author of Guymager and these pages is not responsible, not liable nor anything else for the content of extern
web pages that are linked on this website nor for extern web pages linking to this one, nor for anything else.
There is no guarantee for any software to work and any software may damage anything, bla bla bla...
LFO!

